Thursday, June 28, 2012

The Grand Finale!


And


ARE TEAMING UP THE ENTIRE MONTH OF JUNE TO BRING YOU AN AMAZING CREATIVE COLLABORATION MIXING DREAMWEAVER STENCILS AND ART GLITTER. COME ALONG FOR THE RIDE...WE PROMISE IT WILL BE A SPARKLING ONE!


This week I decided to try something completely different. After 3 tries. . . . it worked!!

I started with LG740 Open ButterflyMeasure a piece of Dreamweaver Double sided Mounting Paper the size of the stencil. Attach one side to cardstock.
Before soaping the back of the stencil, lay it over the piece of paper you just peeled off the double stick tape. Trace the body and the bottom tips of the image onto the paper.
Next take stencil LL3021 Retro Standing CatTrace the head twice onto the protective paper. Cut out to create 5 masks.

Soap back of butterfly and set over the double stick tape. Lay masks in place on the butterfly (slick side against sticky side of tape).
Next apply glitter in the following order. Pressing in place and tapping off excess in between steps.
1) Dark Brown from Reggae set over antenna.
2) #230 Halo over entire butterfly.
3) Remove mask from body and lower sections of butterfly. Cover areas with Dark Brown from Reggae set.
4) Remove butterfly stencil. Cover remaining background with Blue from the Celebrate Mini set.
5) Remove one cat head mask. Soap back of cat stencil. Lay over open area. Press down with erasure. Cover in Dark Brown from Reggae set. Tap off excess before removing cat stencil. Remove stencil.
6) Cover open areas (eyes, nose, etc) of cat area with #230 Halo.
7) Repeat steps 5 and 6 on other wing.
Outline wings with fine line black marker to help pop wings. I tried it with a dark body, light accents and crystal background. It looked okay, but liked the way this one turned out best. Also tried using the larger kitty head and it was just too big.
Trim, mount on decorative paper and Tah-dah!! It worked.
I really had fun getting this idea to work. Give it a try, it went together quickly once I figured out which glitter colors to use.

Visit the Art Glitter blog and the Dream It Up! blog for fabulous inspiration from both talented design teams. We are encouraging all of you to play along with the challenge of creating with Dreamweaver Stencils and Art Glitter*, preferably using the Double-Glitter Technique with a wedding theme. Just link your creation to the Mr. Linky on the Dream It Up! blog, or email pics to lynell@dreamweaverstencils.com, for an opportunity to win one of four fabulous glitter and stencil prize packages. One winner will be chosen each week. (US and Canada only, please).


For more inspiration from the Art Glitter design team, please visit their blog for a complete list of players throughout the month.For more inspiration from the Dream Team, here's the blog list for this week:
Dream It Up! blog
Pam Hornschu
Laura Drahozal
Louise Healy
Wendy Jordan
Terrece Siddoway
Kristi Van Doren
Georgia Sommers
Lee Kellogg
Jessie Hurley
Liz Martin
Cyndi Bundy
Cherylynn Moser

*For the month of June Art Glitter is selling 1 oz jars of glitter for $5.98 (regular price $7.32)! Get the deets HERE!

Thursday, June 21, 2012

More double glitter flowers!


And


ARE TEAMING UP THE ENTIRE MONTH OF JUNE TO BRING YOU AN AMAZING CREATIVE COLLABORATION MIXING DREAMWEAVER STENCILS AND ART GLITTER. COME ALONG FOR THE RIDE...WE PROMISE IT WILL BE A SPARKLING ONE!


This week I'm doing something simple again. I've been working on my spectacular finale for next week. (That is if it comes out, so far so good!!)
Start with the Delicate Star Flower, LL307
Follow instructions listed in last weeks post.

There is a fabulous tool that I use to make placing the colors exactly where you want them so easy........its a straw. Really! Cut a straw at an angle then barely cut the pointed tip off. This allows easy placement of the different colors. Notice on the stencil there isn't a middle circle on the flower in the center. I used the straw placement tool to apply the yellow. It went right where I needed it to!

Assemble and tah-dah, clean and simple double glitter card.
LOVE this technique.

Visit the Art Glitter blog and the Dream It Up! blog for fabulous inspiration from both talented design teams. We are encouraging all of you to play along with the challenge of creating with Dreamweaver Stencils and Art Glitter*, preferably using the Double-Glitter Technique with a wedding theme. Just link your creation to the Mr. Linky on the Dream It Up! blog, or email pics to lynell@dreamweaverstencils.com, for an opportunity to win one of four fabulous glitter and stencil prize packages. One winner will be chosen each week. (US and Canada only, please).


For more inspiration from the Art Glitter design team, please visit their blog for a complete list of players throughout the month.For more inspiration from the Dream Team, here's the blog list for this week:
Dream It Up! blog
Pam Hornschu
Laura Drahozal
Louise Healy
Wendy Jordan
Terrece Siddoway
Kristi Van Doren
Georgia Sommers
Lee Kellogg
Jessie Hurley
Liz Martin
Cyndi Bundy
Cherylynn Moser

*For the month of June Art Glitter is selling 1 oz jars of glitter for $5.98 (regular price $7.32)! Get the deets HERE!

Thursday, June 14, 2012

More Wedding and/or double glitter technique


And


ARE TEAMING UP THE ENTIRE MONTH OF JUNE TO BRING YOU AN AMAZING CREATIVE COLLABORATION MIXING DREAMWEAVER STENCILS AND ART GLITTER. COME ALONG FOR THE RIDE...WE PROMISE IT WILL BE A SPARKLING ONE!

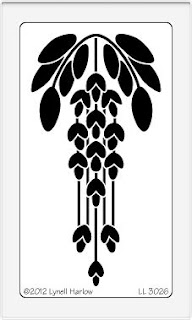
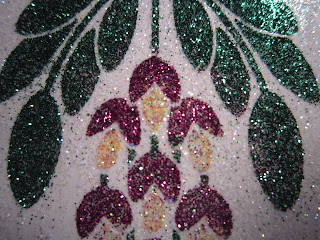
This week I'm using one of my new favorite stencils, the LL 3026 Nouveau wisteria:


In addition the the stencil you will also need, Dreamweaver Hawaiian Coconut Oil soap, double sided mounting tape and Reggae Pee Wee Glitter Set from Art Glitter.

Directions:
1) Apply soap to the back of your stencil. The stencil is going to be placed on Double Sided Mounting Paper and the soap will prevent the stencil from sticking to the paper. Apply a generous amount of soap. I like to add just a bit more when I think I have applied enough.

2) Place stencil, soap side onto the Double Sided Mounting Paper. Save the protective backing from the paper, to press onto the top of your stencil to ensure that is properly adhered.

3) Apply glitter in desired areas, with desired colors. Again, use the backing from the Double Sided Mounting Paper to press onto the top of the glitter and stencil to adhere as much glitter as you can. Use a Glitter Magnet or Swiffer to pick up excess bits of glitter from your project. This is an important step. The tiny bits of glitter will sit on top of the project or pile into the small crevices of the stencil, when the stencil is removed, the bits of glitter will fly to undesired area’s on the exposed Double Sided Mounting Paper.

4) Remove stencil from Double Sided Mounting Paper and sprinkle a white or transparent glitter on the rest of the exposed, adhesive area of the paper.


Mount onto decorative paper.

Visit the Art Glitter blog and the Dream It Up! blog for fabulous inspiration from both talented design teams. We are encouraging all of you to play along with the challenge of creating with Dreamweaver Stencils and Art Glitter*, preferably using the Double-Glitter Technique with a wedding theme. Just link your creation to the Mr. Linky on the Dream It Up! blog, or email pics to lynell@dreamweaverstencils.com, for an opportunity to win one of four fabulous glitter and stencil prize packages. One winner will be chosen each week. (US and Canada only, please).


For more inspiration from the Art Glitter design team, please visit their blog for a complete list of players throughout the month.For more inspiration from the Dream Team, here's the blog list for this week:
Dream It Up! blog
Pam Hornschu
Laura Drahozal
Louise Healy
Wendy Jordan
Terrece Siddoway
Kristi Van Doren
Georgia Sommers
Lee Kellogg
Jessie Hurley
Liz Martin
Cyndi Bundy
Cherylynn Moser

*For the month of June Art Glitter is selling 1 oz jars of glitter for $5.98 (regular price $7.32)! Get the deets HERE!
Wednesday, June 6, 2012

June Challenge - Wedding and/or double glitter technique


And


ARE TEAMING UP THE ENTIRE MONTH OF JUNE TO BRING YOU AN AMAZING CREATIVE COLLABORATION MIXING DREAMWEAVER STENCILS AND ART GLITTER. COME ALONG FOR THE RIDE...WE PROMISE IT WILL BE A SPARKLING ONE!

Visit the Art Glitter blog and the Dream It Up! blog for fabulous inspiration from both talented design teams. We are encouraging all of you to play along with the challenge of creating with Dreamweaver Stencils and Art Glitter*, preferably using the Double-Glitter Technique with a wedding theme. Just link your creation to the Mr. Linky on the Dream It Up! blog, or email pics to lynell@dreamweaverstencils.com, for an opportunity to win one of four fabulous glitter and stencil prize packages. One winner will be chosen each week. (US and Canada only, please).


For more inspiration from the Art Glitter design team, please visit their blog for a complete list of players throughout the month.For more inspiration from the Dream Team, here's the blog list for this week:
Dream It Up! blog
Pam Hornschu
Laura Drahozal
Louise Healy
Wendy Jordan
Terrece Siddoway
Kristi Van Doren
Georgia Sommers
Lee Kellogg
Jessie Hurley
Liz Martin
Cyndi Bundy
Cherylynn Moser

*For the month of June Art Glitter is selling 1 oz jars of glitter for $5.98 (regular price $7.32)! Get the deets HERE!
Also check out Lynell showing the Double Glitter technique on YouTube video 109-2.

This week my design is rather simple. I started with a new stencil from Dreamweaver;

LM 2011 Poppy circle

Follow the double glitter technique from Dreamweaver


I used a combination of colors from the Art Glitter sets Celebrate and Reggae


Try it yourself, it's fun and results are incredible. Make sure to add your creations to Mr. Linky on the Dreamweaver blog. Leave comments you could win. The more blogs you visit, the more comments you make and the more samples you add, the better your chances to win!! See you back here next week.